About workflows and how to get started#
About workflows#
Computational workflows in the form of Jupyter Notebooks allow users to combine interactive code with text and graphical objects. They are powerful tools for conducting computational analysis and data exploration, making them particularly valuable for climate risk assessment. These interactive documents combine live code, equations, visualisations, and narrative text in a single, shareable environment.
The workflow notebooks aim to complement the CLIMAAX Methodological Framework, enabling users to put the Framework into practice.
One of the key benefits of Jupyter Notebooks is their ability to facilitate a reproducible and transparent workflows. The workflow is documented step by step, enhancing the transparency of data analysis methodologies.
Availability of the workflows#
Our workflow notebooks are open source, free and available to anyone to try them out.
Use MyBinder
Each workflow has a Binder badge which builds the virtual computing environment with libraries and dependencies specific to it, on a Binder hub.
Public Binder hub is an online service for building and sharing reproducible and interactive computational environments from online repositories.
In this environment the users can run the workflows and make minor changes, but their work will not be saved after the session ends.
This option is there to allow public users to explore the workflows without the need to instal anything to their infrastructure.
Use your local computer
User experienced with Python and Git can download the notebook and asociated repository and work locally.
They can use the workflows as an example or starting point in their own risk assessment.
A dedicated Jupyter hub, hosted in ECMWF infrastructure, is available for the CLIMAAX pilot partners and participants of the open call.
JupyterHub is an open-source, multi-user server for Jupyter notebooks. It is designed to provide a scalable and customizable platform for hosting Jupyter notebooks and instances in a multi-user environment. This will be a place where users can run, edit and create their customized risk workflows according to their needs without having to install anything on their own computer.
This computational environment is managed by the CLIMAAX team.

Fig. 9 Illustration about BinderHub and JupyterHub architecture. From the Turing Way project, illustration by Scriberia. Used under a CC-BY 4.0 licence. DOI: 10.5281/zenodo.3332807#
How to run CLIMAAX workflows locally#
To start using the workflow you will need to have Git and Conda installed.
Don’t leave if you don’t know git!
If you have never used Git but want to learn, have a look at this introduction to Git resource.
If you have a few moments, maybe you can be convinced to use git.
If you have never used Git and don’t have the time for it now, please head to the other tab in this section for the instructions how to download the workflows.
If you are comfortable working Git you can follow these steps to clone the repository and install the invironment to use the wokflows.
Here we show the DROUGHT example, but you can replace it with any other repository name (FLOODS, FIRE, SNOW, HEATWAVES, STORMS)
Open your terminal
Check your conda install with
conda --version. If you don’t have conda, install it by following these instructions (see here)Clone the repository
git clone git@github.com:CLIMAAX/DROUGHTS.git
Move into the cloned directory
cd DROUGHTS
Create and activate your environment from the
environment.ymlfile.
This will create the environment called climaax_droughts. You will need to activate it as well:conda env create -f environment.yml conda activate climaax_droughts
Launch the jupyter interface of your preference, notebook,
jupyter notebookor labjupyter labEdit the notebook(s)
Go to the webpage of the wokrflow repositories: orgs/CLIMAAX and pick up one hazard. As an example here we will go to DROUGHTS repository.
First click on the <> Code button and then Download ZIP file.
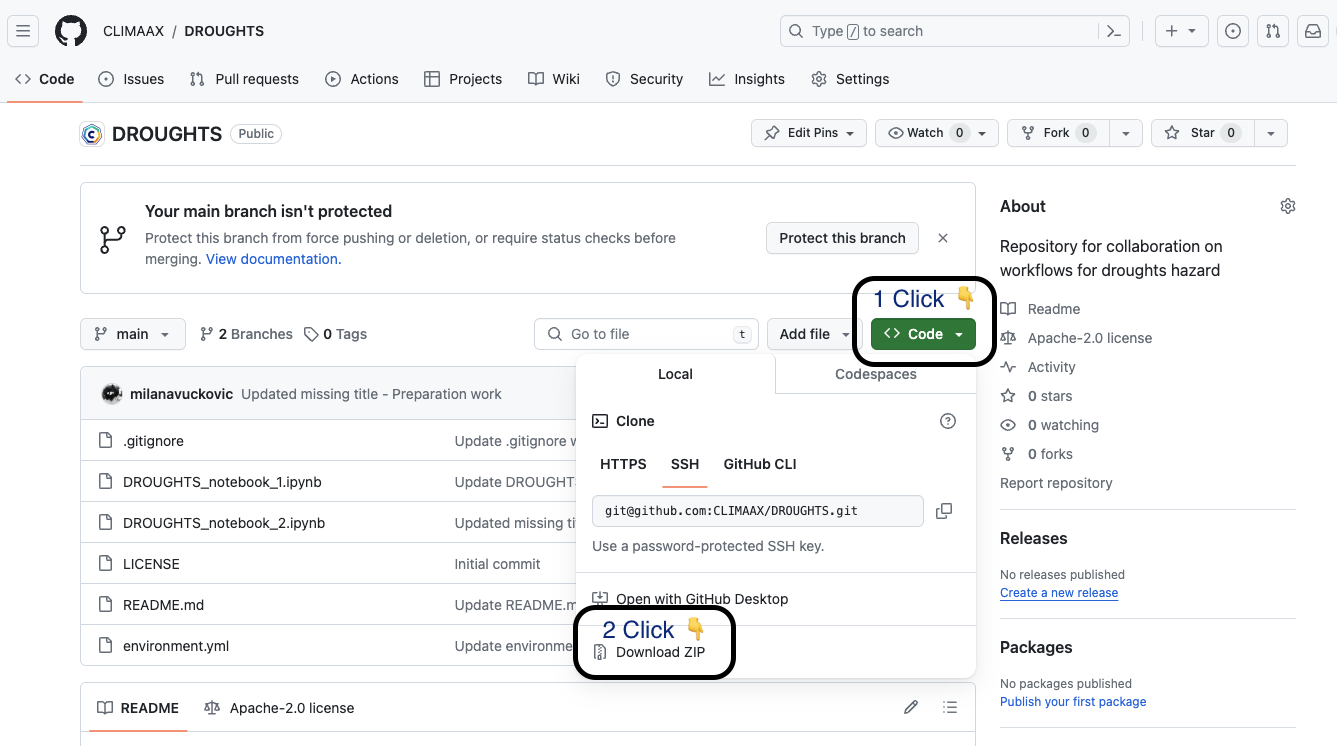
Unzip the file using your favourite tools
Open your terminal
Check your conda install with
conda --version. If you don’t have conda, install it by following these instructions (see here)Move into the workflow directory
cd DROUGHTS
Create and activate your environment from the
environment.ymlfile.
This will create the environment called climaax_droughts. You will need to activate it as well:conda env create -f environment.yml conda activate climaax_droughts
Launch the jupyter interface of your preference: notebook
jupyter notebookor labjupyter labEdit the notebook(s)
Credits The How to run section was adapted from the Environmental Data Science Book project.